English
WT9901C2-SN2 Beginner's Guide
Update history
| Date | Version | Author | Update content |
|---|---|---|---|
| 2025-06-26 | 1.0.0 | Kirto | Initial document release |
1. How to Flash AT Firmware
1.1 Preparation
The following hardware and software are required for flashing firmware on the WT9901C2-SN2 development board:
- Hardware:
WT9901C2-SN2development board x 1TypeC USBcable x 1- Personal computer (operating system supports
Windows 7[64-bit],Windows 10,Windows 11) x 1
- Software:
- AT Firmware x 1
- Flashing Tool x 1
1.2 Entry Page
Open the flashing tool, double-click the .exe file to enter the tool's entry interface, and switch ChipType to esp32c2 as shown below:
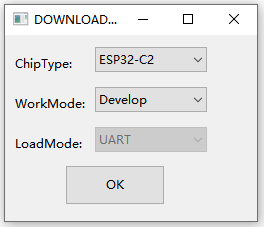
Click OK to enter the main flashing page.
1.3 Select AT Firmware for Flashing
Connect the microcontroller to the computer using a TypeC USB cable and identify its COM port.
Extract the downloaded AT Firmware and configure the flashing tool as shown below:
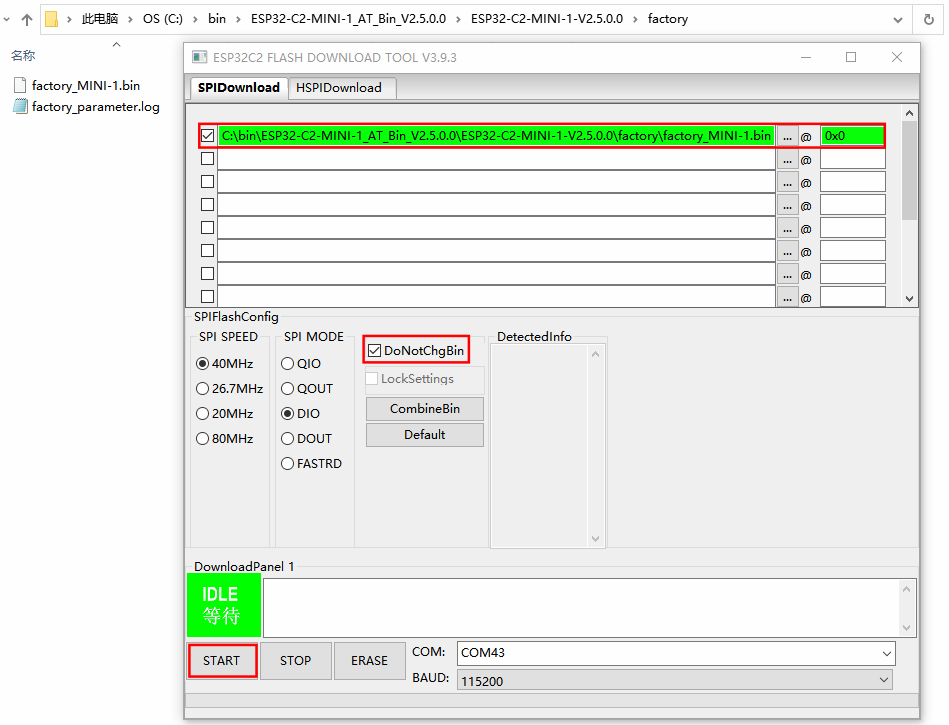
Click START to begin flashing.
Open a serial terminal tool and configure the settings as follows:
- Baud Rate: 115200
- Data Bits: 8
- Parity: None
- Stop Bits: 1
- Flow Control: None
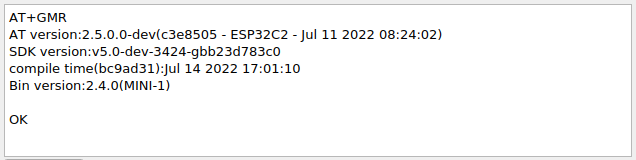
- Enter the "AT+GMR" command with line ending (CRLF)
If the result appears as shown below, it indicates success:
2. How to Set Up ESP-IDF and Compile/Flash the Hello World Example
Set up the environment following the Espressif Official Tutorial
Copy the
examples/get-started/hello_world/folder to your current directory.Activate the
esp-idfenvironment
Done! You can now compile ESP-IDF projects.
Go to the project directory and run:

  idf.py build
- Switch to the
esp32c2target
idf.py set-target esp32c2
- Compile the
hello worldproject
idf.py build
- Flash the
hello worldproject
idf.py flash -p <PORT>
- Open the serial monitor for
hello world
idf.py monitor -p <PORT>
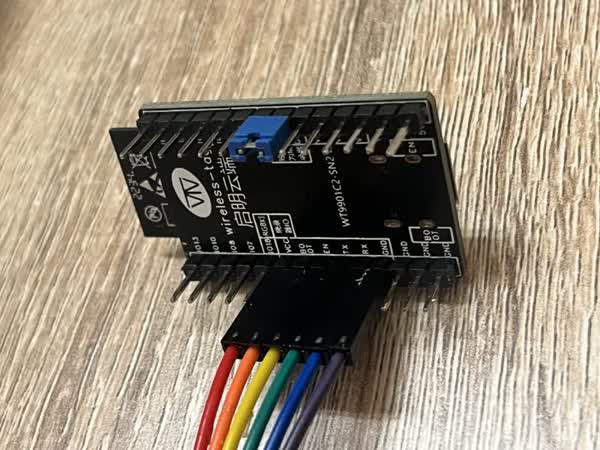
3. How to Use WT9901C2-SN2 as a Flasher for Other Development Boards
Short the EN and GND pins using a jumper cap. The development board can then be used as a flasher or serial monitor. As shown below: